How to Fix a Garage Door Cable (Without Turning Your Weekend Into a Horror Movie)
Let’s be real—garage doors are like the unsung heroes of our homes. They work overtime, rain or shine, and we barely give them a second thought… until something goes wrong. And if you’re here, that “something” is probably a snapped cable, a door that’s hanging lopsided, or a symphony of grinding noises that belong in a haunted house. Don’t panic! We’ve all been there (yes, even us at Clearview Garage Doors in Denver). Let’s walk through how to tackle this safely—because no one wants a garage door horror story.
First Things First: Should You Even DIY This?
Before we grab our tool belts and pretend we’re on a home improvement show, let’s ask the big question: Is this a job for a pro? Garage door cables are under insane tension. One wrong move, and you’re risking injury or turning a simple fix into a pricey disaster.
Here’s our rule of thumb:
- If the door is fully off-track, sagging dramatically, or the spring is involved (garage door spring repair is not a DIY project), call a pro.
- If you’re comfortable with basic tools and the door is still functional (just noisy or slightly misaligned), you might be able to handle it.
FYI, we’ve seen too many “I watched a YouTube tutorial” disasters. If you’re in Denver and feeling unsure, our team at Clearview Garage Doors is just a call away for garage door repair—no judgment, only solutions.
Tools You’ll Need (Spoiler: No Duct Tape Allowed)
Gather these before you start:
- Locking pliers (to secure the door in place)
- Adjustable wrench
- Socket set
- Stepladder
- New cable (match the thickness and length of the old one—bring the broken cable to the store if you’re unsure)
- Work gloves (because shredded palms aren’t a vibe)
Step-by-Step: Fixing the Cable Without Losing a Finger
1. Disconnect the Opener & Lock the Door
First, unplug the garage door opener. Then, clamp those locking pliers onto the track below the door to keep it from crashing down. Think of this as your “sanity saver.”
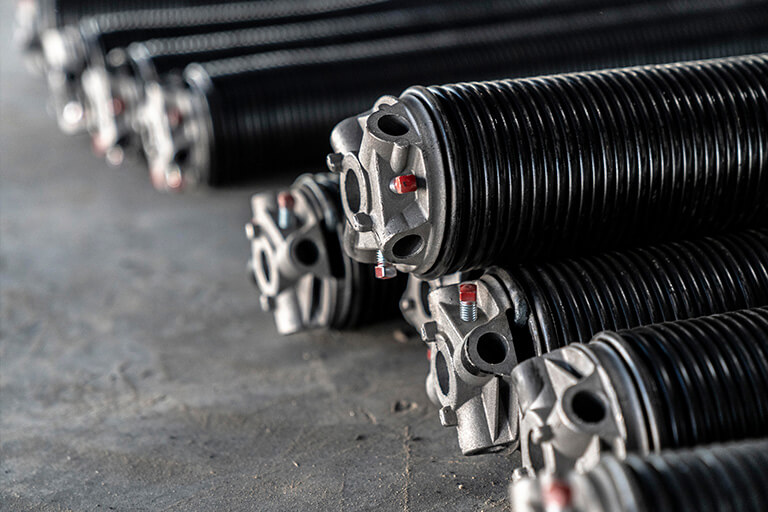
2. Release Tension from the Springs
This is where things get spicy. If you have torsion springs (the big coil above the door), stop right here. These are literal death traps if mishandled. For extension springs (coils on the sides), carefully unwind them using your wrench.
Pro Tip: If you’re sweating bullets right now, that’s your cue to call Clearview Garage Doors for garage door spring replacement. We’re local, we’re fast, and we’ve got your back.
3. Remove the Old Cable
Unhook the cable from the bottom bracket and drum. Take notes (or pics) of how it’s threaded—you’ll need to replicate this later.
4. Install the New Cable
Thread the new cable through the pulley and drum exactly like the old one. Tighten it slowly, keeping tension even on both sides. Uneven cables = a door that’s drunk-walking sideways.
5. Test Carefully
Remove the locking pliers, reconnect the opener, and test the door manually first. Listen for weird noises and watch for jerky movements. If it’s smooth, you’ve nailed it! If not… well, you know who to call.
When DIY Goes Sideways: Why Pros Like Us Exist
Look, we love a good DIY project. But garage doors? They’re like that one friend who’s fun until they’re not. Here’s when to throw in the towel and call for commercial overhead door repair or residential help:
- The spring snapped. Nope. Just nope.
- The door is jammed or off-track. This isn’t a “YouTube and pray” situation.
- You’re staring at insulated garage doors. These heavier doors require specialized tools and expertise.
And hey, if you’re Googling “garage door repair near me” at 2 a.m. because the cable just had to snap during a snowstorm, we get it. Clearview Garage Doors serves Denver day or night—because garage doors have zero respect for business hours.
Prevent Future Meltdowns: Maintenance 101
Want to avoid repeat performances? A little garage door maintenance goes a long way:
- Lubricate moving parts every 6 months (use silicone spray, not WD-40—trust us).
- Check cables and springs for fraying or rust.
- Test the balance monthly: Disconnect the opener and lift the door manually. If it doesn’t stay put, something’s wrong.
- Upgrade weather stripping to keep drafts (and critters) out.
DIY vs. Pro Repair: A Handy Comparison
| Factor | DIY | Professional |
|---|---|---|
| Cost | $20–$50 for parts | $150–$400 (includes labor & parts) |
| Time | 2–4 hours (if you’re lucky) | 1–2 hours (while you nap) |
| Safety | High risk of injury | Zero risk to you |
| Warranty | None (oops) | Usually 1+ years |
FAQs: Your Burning Questions, Answered
1. “How much does garage door cable repair cost?”
For DIY, it’s cheap—under $50. But if you’re hiring a pro in Denver, expect $150–$400 depending on the issue. Pro tip: Clearview Garage Doors offers free estimates.
2. “Can I replace just one cable?”
Technically yes, but always replace both. Otherwise, you’re setting yourself up for another failure (and another weekend in garage jail).
3. “Why does my new cable keep slipping?”
You probably messed up the winding tension. Or the spring is dying. Either way, time to call for garage door spring services.
4. “How long do garage door cables last?”
About 8–15 years—unless you’re slamming the door shut like you’re in a Fast & Furious chase scene.
Final Thoughts: Know When to Fold ‘Em
Fixing a garage door cable can be a badge of honor… or a cautionary tale. If you’re confident, go for it! But if you’d rather spend your weekend not wrestling with tension springs, remember: Clearview Garage Doors is here for garage door installation, repairs, and even garage door gasket installation to keep Denver winters outside where they belong.
And hey, if all else fails, just ask yourself: Do I really want to explain this ER visit to my coworkers?
Stay safe, friends. And when in doubt—call a pro. 😉