How To Fix Those Pesky Gaps Around Your Garage Door (And Stop Throwing Money Out The Door!)
Alright, folks, let’s talk about something we all deal with but often ignore until that first brutal Denver cold snap hits or we see our energy bill skyrocket: gaps around the garage door. You know the ones. Those sneaky little spaces letting in drafts, dust, bugs, and basically turning your garage into an extension of the great outdoors. Not exactly ideal, right? Especially when you’re paying good money to heat or cool your actual house.
We get it. You walk into your garage on a January morning, and it feels like stepping into a walk-in freezer. Or maybe in July, it’s a sauna. And that distinct line of dirt and leaves just inside the door? Yeah, that’s the gap’s calling card. Let’s be honest, a drafty garage door is basically a giant hole in your home’s envelope. It wastes energy, makes the space uncomfortable, and frankly, it’s just annoying.
Here at Clearview Garage Doors, we’ve seen it all in Denver – from minor gaps letting in a little breeze to cavernous openings that practically invite squirrels in for tea. The good news? Fixing these gaps is usually straightforward, cost-effective, and makes a huge difference. We’ll walk you through the why, the how, and when it’s time to call in the cavalry (that’s us!).
Why Bother Plugging These Gaps Anyway?
Seriously, why go through the hassle? Well, beyond just wanting a garage that doesn’t feel like Antarctica in winter, here’s the real deal:
- Slash Your Energy Bills: Your garage is often attached to your house. Cold air leaking in (or hot air escaping) means your furnace or AC works overtime. Sealing gaps is one of the cheapest, most effective ways to improve your home’s energy efficiency. Think of it as putting money back in your pocket.
- Comfort, Comfort, Comfort: Whether you use your garage for parking, storage, a workshop, or even a home gym, a more stable temperature makes it infinitely more usable year-round. No more dashing through an icy garage in your PJs to grab the recycling bin!
- Keep the Critters Out: Mice, spiders, wasps, dust bunnies the size of actual bunnies… gaps are their superhighway. Sealing them up is a major line of defense. Trust us, you don’t want surprise guests setting up shop next to your holiday decorations.
- Protect Your Stuff: Excessive moisture, dust, and pollen getting in can damage stored items, vehicles, and even tools. A tighter seal means cleaner, drier storage.
- Reduce Noise: Believe it or not, a good seal also helps dampen outside noise – traffic, neighborhood dogs, that guy who insists on mowing at 7 AM on Saturday.
Meet the Culprits: Where Gaps Love to Hide
Gaps don’t just magically appear in one spot. They tend to favor specific areas, and understanding where to look is half the battle:
- Along the Bottom: The most common offender! This is where the door meets the garage floor. Uneven floors, worn seals, or a door slightly out of adjustment create the perfect draft tunnel.
- Down the Sides (Vertical Runs): Look where the vertical edges of the door meet the door jamb (the frame). Worn side seals or a door that’s not perfectly square in the opening leave room for air infiltration.
- Across the Top (Header): The seal along the top of the door frame, where the door rests when closed. If this top seal is damaged or compressed, it’s an open invitation for drafts and debris from above.
- Around Windows (If Applicable): If your door has windows, the seals around the glass or the frame itself can degrade over time.
Your DIY Arsenal: Fixing Common Gap Issues
Alright, let’s roll up our sleeves. Many gap fixes are well within the realm of a handy homeowner. Safety first, though! Always disconnect the garage door opener before working near the door or tracks.
H2: Tackling the Bottom Gap Beast
This is usually the biggest source of trouble. Here’s how to handle it:
- H3: Inspect the Existing Bottom Seal: Get down on your hands and knees (yeah, we know, glamorous). Is the rubber seal cracked, brittle, torn, or completely flattened? Can you see daylight underneath it? Does it feel loose? If yes to any, it’s replacement time.
- H3: Choosing & Installing a New Bottom Seal (Garage Door Gasket Installation):
- Measure Twice, Buy Once: Measure the exact width of your garage door opening. Seals come in standard lengths but often need trimming. Buy one slightly longer than your measurement.
- Type Matters: The most common type slides into a retainer channel attached to the bottom panel of the door. You’ll need to match the profile. Bring a sample of the old seal or a clear photo to your hardware store. Common types include T-shaped, bulb, and beaded retainer.
- The Swap: Remove the old seal by pulling it out of the retainer channel. Might take some muscle if it’s old and stuck. Clean out the channel thoroughly – dirt and debris prevent a good seal. Starting at one end, push the new seal firmly into the channel. Work your way across, ensuring it’s seated evenly. Trim any excess length with a sharp utility knife. Easy peasy? Usually. Sometimes that old seal fights back like a bad habit. :/
- H3: What if the Gap is Huge or the Floor is Uneven? If the gap is more than, say, half an inch even with a new seal, or your floor slopes significantly, a standard seal might not cut it. You might need an “ASTM” rated seal (thicker, more durable) or even an “Extended Lip” or “Double Bubble” seal designed specifically for uneven floors. These provide a longer, more flexible barrier.
H2: Sealing Up the Sides and Top
The principles here are similar to the bottom, but the execution differs slightly.
- H3: Inspecting Side and Top Seals (Weather Stripping): Check the rubber or vinyl seals running vertically on the door jambs and horizontally across the top frame. Are they cracked, torn, missing chunks, or pulled away from the frame? Can you easily push them aside with your finger? If so, they need replacing.
- H3: Replacing Side and Top Weather Stripping:
- Removal: These are typically nailed or screwed into the door jamb or header. Carefully remove the fasteners. The old seal might just pull off once the fasteners are out.
- Prep: Clean the area where the new seal will sit. Remove any old adhesive, nails, or debris.
- Installation: Hold the new weather stripping in place. Ensure the flexible flap (the part that touches the door) faces into the garage. Starting at the top for side seals, or one end for the top seal, nail or screw it securely into the frame. Use the existing holes if possible, or make new ones. Space fasteners every 6-12 inches. Pull it taut as you go, but don’t stretch it. Trim the ends neatly.
- H3: Pro Tip – The “Bulb” Seal Advantage: For the sides, bulb seals (a round, hollow tube of rubber) often provide a superior seal compared to flat flaps, as they compress more effectively against the door surface.
H2: When DIY Hits a Wall: Time to Call the Pros
Look, we love a good DIY project as much as the next person. Fixing weather stripping? Absolutely doable. But sometimes, gaps are symptoms of bigger issues that need a professional touch. Ignoring these can lead to bigger headaches (and higher costs) down the road. Here’s when picking up the phone is the smart move:
- The Door is Out of Alignment or Tracks are Bent: If the door isn’t sitting square in the opening, no amount of new weather stripping will create a perfect seal. The door itself needs adjustment. This involves track realignment, which requires expertise and specific tools. Messing with tracks yourself can be dangerous and often makes things worse. This is a job for professional garage door repair.
- Worn or Damaged Rollers: Crunchy, wobbly, or flat-spotted rollers prevent the door from rolling smoothly and can cause it to sit unevenly, creating gaps. Replacing rollers involves tension and precision.
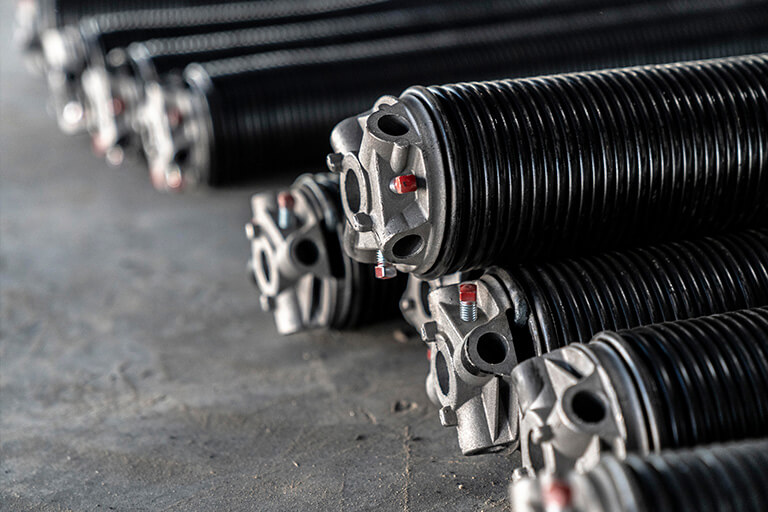
- Spring Problems: Your garage door springs (torsion springs above the door or extension springs along the tracks) counterbalance the door’s weight. If they are broken, worn out, or improperly adjusted (garage door spring repair or garage door spring replacement), the door can be too heavy to close fully or sit unevenly, causing gaps. WARNING: Garage door springs are EXTREMELY dangerous. Never attempt spring repair or replacement yourself. This is absolutely a job for trained technicians like ours at Clearview Garage Doors. We handle garage door spring services safely every day.
- Severe Structural Issues: If the door frame itself is warped, damaged, or the concrete floor has significant heaving, cosmetic sealing won’t fix the root cause. This might require more extensive garage door installation or frame repair.
- You Just Don’t Want To Deal With It: Hey, no judgment! Life’s busy. If diagnosing or fixing the gaps feels overwhelming, call a pro. A thorough garage door maintenance visit from us can identify all potential gap sources and fix them efficiently and safely. We see it all, from residential gaps to complex commercial overhead door repair challenges.
H2: Beyond the Seal: Considering Insulated Garage Doors
While fixing gaps is crucial, sometimes the door itself is the weak link, especially older, single-layer doors. Upgrading to insulated garage doors is a game-changer for comfort and energy savings. Here’s why:
- Superior Temperature Control: Insulated doors (typically polyurethane or polystyrene foam sandwiched between steel layers) act like a thermos, significantly slowing heat transfer. Your garage stays cooler in summer and warmer in winter.
- Enhanced Durability: The insulation adds rigidity, making the door more resistant to dents and damage.
- Quieter Operation: Insulation dampens sound, making the door quieter when opening and closing.
- Increased Home Value: It’s an attractive, functional upgrade for potential buyers.
If your door is old, dented, or just a single layer of steel, investing in new garage doors with insulation might be more cost-effective in the long run than constantly battling drafts from an inefficient door. We offer a wide range of insulated garage doors perfect for Denver’s climate at Clearview Garage Doors – come see the difference!
H2: Garage Door Gap Fixes: Quick Comparison
Here’s a handy table summarizing the common gap fixes:
| Fix Method | Best For… | DIY Difficulty | Approximate Cost Range (Materials) | When to Call a Pro |
|---|---|---|---|---|
| Replace Bottom Seal | Worn, cracked, flattened bottom rubber | ★☆☆ (Easy) | $20 – $80 | If retainer is damaged, gap is very large/uneven |
| Replace Side/Top Weather Stripping | Cracked, torn, loose side/top seals | ★☆☆ (Easy) | $15 – $50 (per side/top) | If frame is damaged, unsure of seal type |
| Upgrade to Thicker/ASTM Seal | Larger bottom gaps, uneven floors | ★★☆ (Moderate) | $40 – $150 | If installation is tricky, seal doesn’t fit |
| Adjust Door Alignment/Tracks | Door sitting crooked, uneven gaps | ✘✘✘ (Pro Only) | N/A | ALWAYS! Requires specialized tools/skills |
| Replace Rollers | Crunchy, wobbly rollers causing uneven closure | ★★☆ (Moderate) | $50 – $150 (kit) | If tracks are complex, tension is concerning |
| Spring Repair/Replacement | Door too heavy, won’t close fully | ✘✘✘ (Pro Only) | N/A | ALWAYS! EXTREMELY dangerous high tension |
| Install Insulated Door | Old, single-layer, inefficient door | ✘✘✘ (Pro Only) | $1000+ (installed) | Highly Recommended for professional installation |
H2: Keeping the Seal Tight: A Little Maintenance Goes a Long Way
You’ve fixed the gaps! Awesome. Let’s keep them that way with some simple garage door maintenance:
- Visual Checks: Every few months, take a quick walk around your closed garage door. Look for daylight peeking through, especially along the bottom and sides. Check the condition of the seals – any new cracks or tears?
- Clean the Seals: Dirt and grime can build up on the rubber, making it less effective. Wipe down the bottom seal and side/top weather stripping with a damp cloth and mild soap a couple of times a year. Keeps them supple.
- Lubricate Moving Parts: A garage door that runs smoothly is less likely to get knocked out of alignment or damage seals. Regularly lubricate rollers, hinges, and springs (if accessible – leave torsion springs to pros!) with a garage door specific silicone or lithium-based lubricant. Avoid WD-40 for long-term lubrication.
- Test the Auto-Reverse: This is a crucial safety feature. Place a block of wood (like a 2×4) on the floor where the door closes. Close the door. It MUST reverse immediately upon hitting the block. If it doesn’t, your opener is unsafe – get it serviced immediately. Do this monthly!
- Listen for Trouble: Grinding, scraping, or loud banging noises signal something’s wrong. Don’t ignore them! Address issues early before they cause bigger problems (and bigger gaps).
H2: Your Burning Questions Answered (FAQ)
Let’s tackle some common questions we hear daily at Clearview Garage Doors:
-
“How much does it cost to fix gaps around my garage door?”
- DIY Seal Replacement: This is the cheapest route. Cost for new bottom seals or weather stripping typically ranges from $20 to $150 depending on quality, type (like thicker ASTM seals), and length needed.
- Professional Weather Stripping Installation: If you hire it out (often part of a tune-up), expect labor on top of parts, maybe $100-$300 total depending on the scope and your location (like Denver labor rates).
- Professional Repairs (Tracks, Rollers, Springs): This is where price increases. Track realignment might be $150-$400. Roller replacement $100-$300. Garage door spring replacement (DANGEROUS – leave it to us!) is typically $200-$500+ depending on the spring type and door weight. New garage doors start around $1000+ installed.
-
“Can I just use caulk or spray foam to seal the gaps?”
- Short Answer: NO! / We see this attempted fix way too often. Caulk and spray foam are rigid. Your garage door needs to move up and down! Applying these will either prevent the door from moving, cause the sealant to crack and fail immediately, or create a huge mess. Stick to flexible rubber or vinyl seals designed for the job.
-
“I fixed the seals, but I still feel a draft! What gives?”
- This is super common and frustrating! It usually points to one of the underlying issues we mentioned: misaligned tracks, worn rollers, or spring problems causing the door not to seat perfectly against the new seals. It could also mean you need a different type of seal (like an extended lip for an uneven floor). If DIY sealing didn’t fully solve it, it’s definitely time for a professional assessment. Give us a call at Clearview Garage Doors – we’ll find the real culprit.
-
“How often should I replace my garage door weather stripping?”
- There’s no single expiration date, but inspect it annually. Factors like Denver’s intense sun (UV damage), temperature swings, and how often you use the door affect lifespan. Typical rubber seals last 5-10 years. Look for the warning signs: cracking, brittleness, flattening, tearing, or visible gaps when closed. If it looks bad or isn’t sealing, replace it! Preventative maintenance is always cheaper than the energy loss or damage later.
Wrapping It Up: Seal the Deal on Comfort & Savings
Fighting gaps around your garage door isn’t just about stopping a draft; it’s about comfort, savings, protecting your belongings, and making your home more efficient. Most of the time, replacing worn weather stripping is a simple, affordable DIY win. Seriously, the bang for your buck here is huge.
But hey, we also know when a job needs a pro’s touch. If your door is crooked, making scary noises, or you suspect spring issues – please, don’t risk it. That’s exactly why companies like ours, Clearview Garage Doors right here in Denver, exist. We handle everything from simple garage door gasket installation to complex garage door spring replacement and commercial overhead door repair. We’re your local experts, familiar with Denver’s unique challenges, from heavy snow loads to intense sun.
So, what’s your next move? Grab a flashlight, check those seals! Maybe it’s a quick trip to the hardware store. Or maybe, it’s realizing you need a pro to get things running smoothly and sealed tight. Either way, tackling those gaps means a warmer (or cooler), cleaner, quieter, and more energy-efficient garage. And that’s something we can all get behind. If you’re near me in the Denver area and want an expert eye, give Clearview Garage Doors a shout – we’d love to help you stop throwing money (and heat!) out the door. Let’s make that garage work for you, not against you.