The Garage Door Spring Tension Tango: Why We Usually Sit This One Out (And You Should Too!)
Hey there, fellow garage tinkerers! Let’s chat about something that makes even the handiest DIYers sweat: garage door spring tension adjustment. We get it – the urge to tweak things ourselves is strong. But here’s the raw truth from our decades at Clearview Garage Doors in Denver: messing with these springs is like wrestling a grizzly bear while balancing on a yoga ball. One wrong move, and… well, you get the picture. So, grab a coffee, pull up a chair, and let’s talk brass tacks about why this job usually screams “call the pros,” how it might be approached (with extreme caution!), and how to keep your door humming safely.
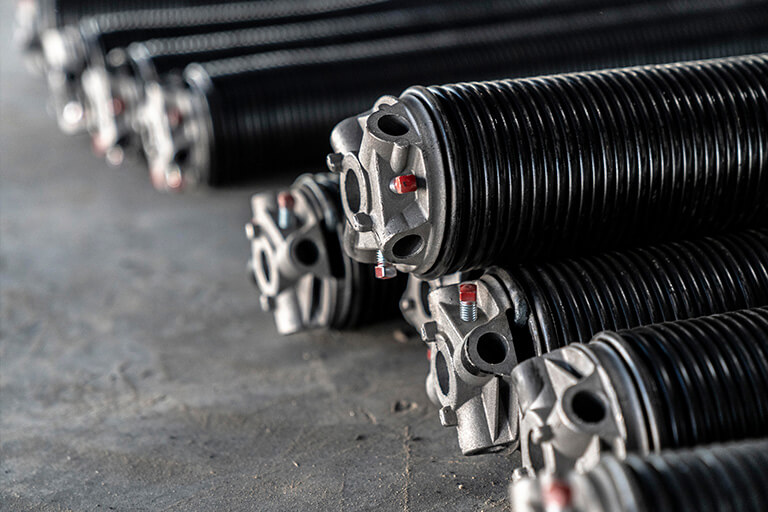
Why Garage Door Springs Are Basically Coiled Lightning
Seriously, ever wonder why your hefty garage door glides up with just a finger-touch? Thank the springs! These high-tension heroes store massive energy to counterbalance the door’s weight. We’re talking hundreds of pounds of force coiled up tighter than a drum. Adjusting that tension isn’t like tuning a guitar string. It’s precise, dangerous, and frankly, why garage door spring repair and garage door spring replacement are jobs we handle daily for relieved Denver homeowners. A slip can mean snapped cables, flying metal, or worse. Not exactly a fun weekend project, right?
Meet the Main Players: Torsion vs. Extension Springs
Knowing what you’re dealing with is step one:
- Torsion Springs: Mounted horizontally above the door opening on a metal shaft. Think thick, tightly wound coils. These pack a HUGE punch and are the most common source of “oh no” DIY stories. They require specific winding bars and techniques. Garage door spring services for torsion systems are complex.
- Extension Springs: Run vertically along the horizontal tracks on each side. They stretch and contract. Still dangerous, but slightly less terrifyingly powerful than torsion springs on larger doors. Common on older or lighter doors.
Here’s a quick comparison:
| Feature | Torsion Springs | Extension Springs |
|---|---|---|
| Location | Mounted horizontally above the door on a shaft | Run parallel to the horizontal tracks on each side |
| Force Level | Extremely high tension | High tension, but generally less than torsion systems |
| Adjustment Risk | ⚠️⚠️⚠️ (Highest risk – requires winding bars) | ⚠️⚠️ (High risk – involves cable tension) |
| Lifespan | Typically longer (15,000+ cycles) | Generally shorter (10,000 cycles) |
| DIY Danger Level | Extreme – Professional STRONGLY recommended | High – Professional recommended |
Why We Grab Our Tool Belts (and Safety Gear) for This One
Look, we love empowering DIY spirit. But adjusting spring tension? That’s where we draw a hard line for most folks. The cost of getting it wrong isn’t just a broken spring – it’s potential injury or major damage. The tools alone (proper winding bars, vise grips, locking pliers, sturdy ladders) are specialized. And knowing the exact number of turns needed based on door weight and spring specs? It’s not guesswork. That’s why garage door spring repair is a core service for us at Clearview – we’ve got the calibrated tools and trained muscle memory. Trying this yourself to save a few bucks might end up costing way more. IMO, it’s just not worth the gamble.
Okay, Okay… The Bare-Bones “If You Absolutely Insist” Safety Prep
Heavy sigh. We really don’t want you doing this. But if you’re determined (and have experience with high-risk mechanical tasks), here’s the absolute non-negotiable prep:
- Kill the Power: Unplug the opener. No “oops” moments with the motor!
- Lock the Door: Secure the door firmly in the fully open position using C-clamps on the tracks BELOW the bottom rollers. This prevents accidental drops.
- Gear Up: Safety glasses are mandatory. Heavy work gloves? Essential. Consider a hard hat too – no joke.
- The Right Tools: You MUST have the correct, hardened steel winding bars for torsion springs (never use screwdrivers!). For extension springs, you need proper pliers and a solid understanding of the safety cable routing. FYI, using the wrong tools is asking for trouble.
- Clear the Area: Make sure no people or pets are anywhere near the door path. Seriously.
- Know Your Spring: Count the coils, measure the wire diameter and length, note the winding direction. This determines the force.
The Steps We Hope You Skip (The Torsion Spring Tension Waltz)
Again, this is highly dangerous. We strongly advise calling Clearview Garage Doors or another certified pro near you. But for educational purposes:
- Locate the Winding Cone: Find the end of the spring attached to the winding cone on the torsion tube.
- Insert Winding Bars: Firmly insert the first winding bar into a hole on the winding cone. Hold it steady and horizontal. Insert the second bar into the next hole.
- The Critical Turn: Slowly and steadily, turn the winding bars (usually a quarter or half turn at a time) in the direction specified for your spring (left or right wind). Keep firm control. The bars can kick back violently if you slip.
- Locking the Cone: After each small adjustment, move the first bar to a new hole to lock the cone before removing the second bar. Never remove both bars while tension exists!
- Test Cautiously: Release the door clamps very slightly to see if the door balances. If it doesn’t stay put around 3-4 feet off the ground, repeat the process (adding or removing tension). Never stand under the door during testing!
When Dialing Clearview Garage Doors is the Smartest Move (Which is Almost Always)
Honestly, most situations call for a pro. Here’s when picking up the phone is non-negotiable:
- You Hear a Loud “BANG!”: That’s likely a broken spring. Garage door spring replacement is needed. Don’t operate the door!
- The Door is Wildly Unbalanced: It slams shut or rockets open uncontrollably.
- Visible Spring Damage: Rust, gaps, or obvious wear. These are ticking time bombs.
- Upgrading Your Door: Installing new garage doors, especially insulated garage doors (a great choice for Denver’s climate!), requires precise spring sizing and adjustment. We handle this seamlessly with every garage door installation.
- Zero Experience: If this guide makes you nervous, trust that instinct!
- Commercial Needs: Commercial garage door repair and commercial overhead door repair involve heavier doors and springs – absolutely pro territory.
Why choose us? We’re your Denver neighbors! We know the specific wear and tear our local weather causes. We carry all spring types in our trucks, our pricing is transparent (no hidden fees!), and our techs are certified and insured. Searching “garage door repair near me” or “garage door spring services Denver”? We’re here! 🙂
Keeping Your Springs (and Door) Happy: Less Adjustment, More Enjoyment
Want to avoid frequent tension headaches? Regular garage door maintenance is key! We recommend:
- Visual Checks: Every month, look for rust, gaps, or loose cables. Listen for grinding or squealing.
- Lubricate: Twice a year, use a silicone-based lubricant on springs, rollers, hinges, and bearings. Avoid grease or WD-40!
- Balance Test: Every 3-6 months, disconnect the opener (pull the red cord) and manually lift the door halfway. If it doesn’t stay put, the balance is off – call us!
- Seal the Deal: Replace worn weather stripping and consider garage door gasket installation to keep Colorado drafts, dust, and pests out. Makes a huge difference for insulated garage doors efficiency!
Your Burning Spring Questions (We Hear These Daily!)
-
“How much does garage door spring replacement cost?”
The price varies based on spring type (torsion costs more than extension), door size/weight, and whether it’s a single or double spring system. Generally, expect a range, but we offer upfront quotes after diagnosis. It’s almost always less than an ER visit! -
“Can I just replace one spring if I have two?”
Nope. Springs wear evenly. Replacing just one puts immense stress on the new spring and the remaining old one, leading to rapid failure. Always replace torsion springs in pairs. It’s a safety must. -
“How often do springs actually need replacing?”
Lifespan depends on usage (cycles per day), spring quality, and maintenance. Torsion springs typically last 7-15 years; extension springs 5-10 years. If your door is over 10 years old, be vigilant! -
“Is adjusting springs really THAT dangerous?”
Yes. Unequivocally, yes. The stored energy is immense. Flying metal parts, snapped cables, and severe injuries are common outcomes of DIY attempts. We’ve seen the aftermath – it’s why garage door spring repair is a cornerstone of our Denver business. Leave it to the trained folks with the right tools and safety protocols.
Wrapping It Up: Safety First, Garage Second
Adjusting garage door spring tension isn’t a badge of DIY honor; it’s a high-risk maneuver best left to professionals. We’ve adjusted thousands of springs safely at Clearview Garage Doors because we respect the physics and prioritize safety above all else. Think of it like defusing a bomb – exciting in movies, terrifying in real life. Save your DIY energy for painting or shelving. For anything involving those high-tension coils, give us a shout. We’ll get your door balanced, safe, and smooth-running faster than you can say “spring catastrophe avoided.” Stay safe out there, Denver! 🙂